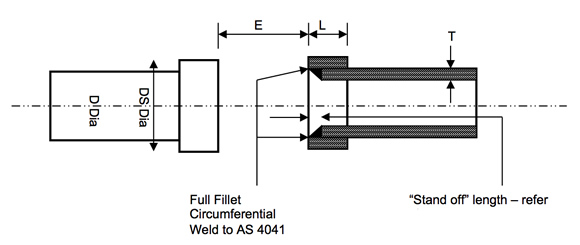
All A.C. Whalan & Co PTY LTD Shouldered Pipe is manufactured in an ISO 9001 accredited Mill, from Mill test certificated strip to our specifications.
The welding of the Shouldered End Ring is conducted in house by the manufacturer and welded in accordance to Australian Standards. The galvanizing is completed post end welding in accordance to AS/NZS 4680.
The testing of the Shouldered product is conducted by accredited / certified testing facilities such as SGS or Bureau Veritas. With the Hydrostatic testing being conducted in accordance to AS:4037 and the tensile tests are conducted in accordance to AS:1391.
As a result of the above minimum requirements, quality assurance, procedures, practices and testing we can confidently say and publish that the A.C Whalan & Co Hot Dipped Galvanised Shouldered Pipe has the following minimum strengths, tolerances and working pressures.
MATERIAL STRENGTHS
- Minimum Longitude Yield Strength 350 MPa
- Minimum Transverse Yield Strength 289 MPa
- Minimum Tensile Strength 430 MPa
DIMENSIONS - TOLERANCES - PRESSURES FOR STEEL SHOULDER PIPE
- Weld – On steel shoulder rings provide an interference fit with the outside of the pipe ends and therefore must be a neat fit.
- Pipe ends to which steel shoulder rings are to be fitted should be within the tolerances detailed under Shoulder Dimensions, refer to the below table.
- The pipe ends should be measured with a circumferential tape ( or other effective averaging device ) to obtain these figures.
- Pipe not within this tolerance must be sized for 50mm from the end.
- Care is required when fitting shoulder rings to ensure that ring distortion does not occur.
- It is important that the distance between the edge of the steel shoulder ring and the pipe end be accurately maintained. If this “Stand off” (refer to the below table) is exceeded, distortion will occur. A setting jig is recommended for holding & fixing.
- The pipe ends & steel shoulder rings must be clean & free from rust, grease & paint before welding.
- After welding, remove all splatter from the face & edge of the steel shoulder ring.
- If after welding, pipe ends are found to be oval, they must be rounded to the standard dimensions & tolerances to fit the housings.
(Refer Shoulder dimensions)
| SHOULDER DIMENSIONS | |||||||
| Outside Dia mm |
Nominal Pipe Size mm |
"D" Dia mm |
"DS" Dia mm |
TOLERANCE | "L" Dimension mm |
||
| Plus Minus mm mm |
|||||||
| 60.3 | 50 | 60.3 | 66.5 | 0.8 | 0.8 | 16 | |
| 88.9 | 80 | 88.9 | 97 | 0.8 | 0.8 | 16 | |
| 114.3 | 100 | 114.3 | 122 | 0.8 | 0.8 | 17.5 | |
| 165.1 | 150 | 165.1 | 174.5 | 0.8 | 0.8 | 17.5 | |
| 168.3 | 150 | 168.3 | 178 | 0.8 | 0.8 | 17.5 | |
| 219.1 | 200 | 219.1 | 232 | 0.8 | 1.4 | 20.5 | |
STAND OFF
- 5mm for pipe 88.9mm outside diameter and below.
- 6.5mm for pipe 114.3mm outside diameter up to and including 762mm outside diameter.

WORKING & TEST PRESSURES
| Outside Diameter mm | Wall Thickness mm | Maximum Working Pressure | Maximum Test Pressure | Length Tolerance of Pipe | Dimension Length | |
| mpa | mpa | plus | minus | metre | ||
| 60.3 | 2.0 | 8.8 | 19.0 | 50 | 0 | 6.5 |
| 88.9 | 2.0 | 5.6 | 12.0 | 50 | 0 | 6.5 |
| 114.3 | 2.0 | 5.6 | 10.0 | 50 | 0 | 6.5 |
| 165.1 | 2.5 | 4.2 | 8.8 | 50 | 0 | 6.5 |
| 219.1 | 3.2 | 3.8 | 8.0 | 50 | 0 | 6.5 |
- The above test and working pressures only relate to internal pressures in straight pipe when the maximum working medium temperature is 50 degrees Celsius.
- The maximum working pressure of a piping system is limited to the capabilities of the joining system. In the Shouldered Pipe Product this working pressure is limited to that of the Shouldered Couplings working pressure. Systems should therefore be designed with the couplings maximum working pressure in mind.
